Technology: Security
Area: AAA
Vendor: Cisco
Software: AAA feature compatibility required
Platform: Catalyst platforms, Routing platforms
Introduction
RADIUS is a security feature working in client/server mode. It provides authorization access to the network and combines the authentication and authorization processes. What’s essential, RADIUS cannot control the authorization level of users. Nowadays, all RADIUS server implementations are operating on port 1812. So UDP/1812 is the authentication and authorization port, and UDP/1813 is the accounting port. However, the historic RADIUS versions used UDP/1645 both for authentication and authorization, and UDP/1646 for accounting.
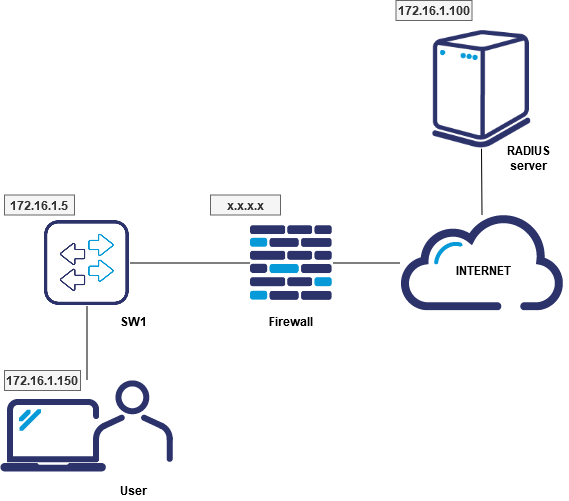
Let’s take the following example network topology:

Configuration
To configure RADIUS correctly, you first need to create user accounts and add specific devices to the RADIUS server. If you have already done so, it is time to configure the AAA login authentication and authorization. Let’s assume that SW1 is an L3 switch, but it may be the router as well. Mind to globally enable the AAA first. To do so, use the “aaa new-model” command, as shown below. Moreover, the RADIUS server’s location must be configured, along with a shared encryption key agreed upon the client and server sites.
Case 1:
SW1(config)# aaa new-model

SW1(config)# aaa authentication login default group radius local

SW1(config)# aaa authorization exec default group radius local

SW1(config)# radius server-host 172.16.1.100

SW1(config)# radius server-host key zaq1@WSX
Note that int the second line, the named list is default one (default), and there are two authentication methods (radius and local). It means the first authentication method is RADIUS, but if it doesn’t respond, then the local database is used (local devices’ user). It’s applied for tty, vty, console, and all the other login connections. There may be a situation where we do not include the word “local” in the command. In this case, if there is no connection to the RADIUS server, authentication will fail. The same applies to the authorization in the third line.
Case 2:
SW1(config)# aaa new-model
SW1(config)# aaa authentication login CONSOLE line
SW1(config)# aaa authorization exec default group radius local
In this case, the CONSOLE list is defined, so if we apply this list to line con 0, we will obtain authentication using the password set on line con 0.
SW1(config)# line con 0

SW1(config-line)# exec timeout 0 0

SW1(config-line)# password zaq1@WSX

SW1(config-line)# login authentication CONSOLE
You need to enter the password zaq1@WSX to get console access. If we change the “line” to “local”, the local user and password will be used again. By typing “none” instead of “line” or “local” we disable authentication.
Case 3:
SW1(config)# aaa new-model

SW1(config)# aaa authentication enable default group radius enable

SW1(config)# aaa authorization exec default group radius local
In this last case, the device will request a password, but you’ll need to define the username on the RADIUS server. If the RADIUS server doesn’t reply, the local database is used (local devices’ user). There is one thing left to do to complete the basic RADIUS configuration.
Depending on how you have configured RADIUS and added devices to the server, the source VLAN will be added to the switch. The host presented in the article belongs to VLAN 101, with its address added to RADIUS in the following form 172.16.1.150.
Therefore, you must enter on the switch:
SW1(config)# ip radius source-interface Vlan601
Configuring AAA Server Groups:
We can also configure RADIUS differently. We can create server groups. To do this, you have to enter the following commands:
SW1(config)# radius server someserver

SW1(config)# aaa group server radius somegroup

SW1(config-sg-radius)# server 172.16.1.100 acct-port 1616

SW1(config-sg-radius)# end
Author: Karol Piatek


