Currently the majority of vendors has started to implement the IPv6 addressing scheme, hence IPv6 routing protocols are required to provide the routing functionalities. There are numerous IPv6-capable routing protocols been developed, such as RIPng, EIGRPv6, and OSPFv3. RIPng (RIP for IPv6) is designed to provide routing functionalities for an IPv6-based network. It is the next generation RIP protocol that provides the features necessary to perform the tasks which were earlier done by RIPv2 for IPv4.
The key differences between RIP for IPv4 and RIP for IPv6 (RIPng) are:
- RIPng routers utilize link-local addresses to keep track of the next-hop addresses of the neighbouring routers;
- RIPng uses FF02::9 (contrary to 224.0.0.9 in RIPv4) as the destination address in order to exchange the routing information with the neighbouring routers.
- To configure RIPng on Cisco routers, the interface configuration mode must be enabled for the advertisement of a network. In RIP for IPv4, it is achieved by using the network command in the router configuration mode.
Configuration of RIPng on a Cisco Router
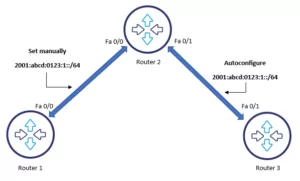
To configure RIPng in this scenario, the topology on the picture below is used.

After the network setup is complete, it is time to configure the appropriate IPv6 addresses on each router. Before continuing with configuration of RIPng on Cisco routers, it is crucial to understand the commands used to configure RIPng.
Understanding RIPng commands
Syntax
To succeed in configuring the RIPng routing protocol configuration, the following commands are required.
1. Execute the following command to enable the IPv6 routing on a Cisco router.
Router(config)#ipv6 unicast-routing
2. After enabling the IPv6 routing, switch to the interface configuration mode for the interface that is selected to be included in the RIPng routing process.
Router(config)#interface <interface name/number>
3. In the interface configuration mode, execute the following command to enable the RIPng routing protocol.
Router(config-if)#ipv6 rip <routing process name> enable
RIPng configuration steps
After the the commands used to configure RIPng are well-known, it is time to configure RIPng routing for the above-mentioned network topology.
- On Router1, the following commands are used to configure RIPng:
Router1(config)#ipv6 unicast-routing

Router1(config)#interface Fa 0/0

Router1(config-if)#ipv6 rip mark enable

Router1(config-if)#exit
Note: In the preceding command, we keyword “mark” was used as the RIP process name.
- On Router2, the following commands are used to configure RIPng:
Router2(config)#ipv6 unicast-routing

Router2(config)#interface Fa 0/0

Router2(config-if)#ipv6 rip mark enable

Router2(config)#interface Fa 0/1

Router2(config-if)#ipv6 rip mark enable

Router2(config)-if#exit
- On Router3, the following commands are used to configure RIPng:
Router3(config)#ipv6 unicast-routing

Router3(config)#interface Fa 0/1

Router3(config-if)#ipv6 rip mark enable

Router3(config)-if#exit
- Once the RIPng routing is configured on all routers, the show ipv6 route command must be executed to display the routing table. The following picture shows the RIPng configuration implemented on the Router3.

As it can be noticed from the picture, the 2001:ABCD:123:1::/64 network has been added on Router3 via the RIPng routing protocol.
Verifying RIPng configuration
For verification and testingof the RIPng configuration, execute the following commands on Router3.
Router3#ping 2002:abcd:123:1::1
Router3#ping 2001:abcd:123:1::1

From the command output, it is clear that the Router3 can successfully reach the Router1.
Another necessary RIPng command that should be known is show ipv6 rip database. This command is used to display RIP database on a Cisco router.

Author: Jaroslaw Banakh


