Migrating to a data & service cloud is a thing that resembles a gigantic cargo rolling stock gaining momentum. Its inception is already very far behind us, and currently we’re at a point, where this monstrosity of scrap metal has accelerated so much that it’s impossible to stop. It still picks up speed, grows stronger, pulls more and more stuff behind it, and it does all of this more and more efficiently. It encroaches new territories and expands its capabilities. The world is happy to subject itself to cloud migration in every sense of the word. Currently, almost every business uses, or will use momentarily, services, data and tools that work outside the local infrastructure.
Managing the cloud IT infrastructure is nothing new. It emerged years ago and – especially nowadays – will raise no eyebrow. However, administrators, who for many various reasons (often very sensible!) delay this inescapable development for as long as possible, often cannot catch up with the growth of this aspect. The network & server infrastructure administration is a critical field, so the aversion to getting “top secret” stuff out to the “public sphere” (which the Internet is broadly speaking) is not a shocking approach. What if you finally decide to manage your network devices via cloud services, however? You could try to convert your existing hardware. Join me for our Cisco Catalyst Series 9200, 9300 and 9500 Conversion Guide to Meraki Dashboard.
Which Switches Are Supported by Meraki Dashboard?
The 9200, 9200L, 9300, 9300L, 9300X, 9500 Series. You can check the detailed list on the manufacturer’s website. The supported firmware versions as of the date of publication of this article is IOS-XE 17.3.1-17.9.2.
Migration Models & Licensing
The Catalyst Switch can show up in your Meraki dashboard in two versions:
as a monitored switch (so-called Cloud Monitoring), without the ability to alter the configuration. Currently this model works seamlessly, so it will be the focus of this article;
as a monitored & managed switch (so-called Cloud Management) – currently supported only by select 9300 Series switches with firmware versions IOS-XE 17.8.1 or later.
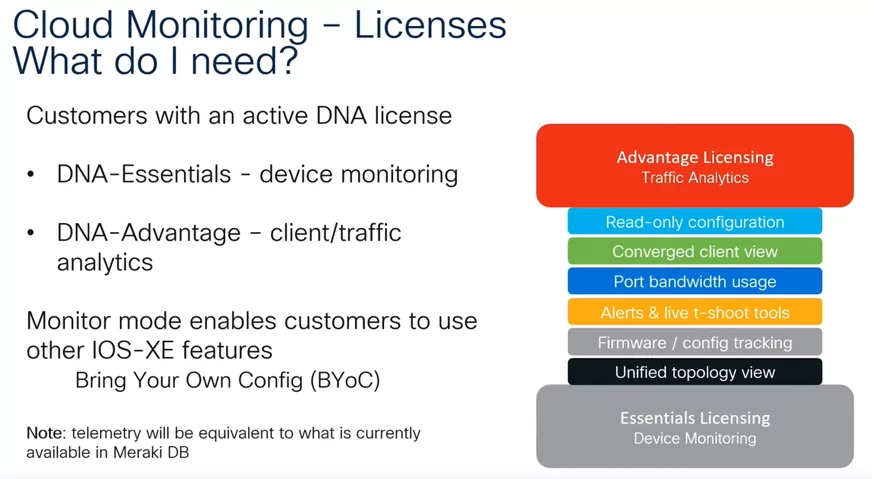
Monitored switches will be using Meraki license, while the fully managed ones (Cloud Management) will require a DNA Advantage (DNA-A) or a DNA Essentials (DNA-E) license. The difference being that the DNA-E version doesn’t enable app detection and monitoring, and inspections of customer’s network activity – this also applies to the “Cloud Monitoring” mode. The differences are shown in detail by Cisco in their own resources.
Meraki Dashboard Licensing. Source: Cisco
Note! The Catalyst 9300 switch, managed via the Meraki dashboard, will no longer be a IOS-XE-based device! Only Meraki software will run on it, and this change is fully reversible. Stacks are also supported. For monitored only switches, the software remains unchanged and you can still log into its CLI, and manage them as you did up to now, in a traditional manner.
Does Meraki Override DNA Center?
No. Currently Cisco allows the choice between three switch management modes, depending on the model owned and the type of license: local (via GUI or SSH), via DNA Center, or via the Meraki dashboard. Each of these methods has different features and it’s impossible to consider them working concurrently, but that’s a topic for a separate article.
Potential Problems & Notes on Migration in the Cloud Monitoring Model
Cisco informs that this process may cause issues in several areas, and it’s worth learning about them before deciding to migrate. They are as follows:
No support for switch login authentication through a RADIUS server (work on enabling this functionality is in progress).
Support only for the default VRF – if you have a larger number of virtual routing tables created, they will not be accommodated.
No proxy support. Both the switch and the Cisco migration tool (more on this later) require direct access to Internet resources, specified in the later section of the article, on port TCP 443.
If the switch is managed via Cisco DNA Center, the telemetry entered into the switch configuration after migration to Meraki dashboard for traffic and device monitoring, may cause conflicts with the one that powers DNA Center. Cisco informs that, as of now, they are not responsible for the effects of different telemetry mechanisms concurrent operation, and recommends disabling the one used by DNA Center.
If the switch has NetFlow set up, the migration tool will keep the configuration as is, so it will be impossible to track the network traffic and detect applications using the Meraki dashboard.
Pre-flight Check
The list of requirements is long, and taking some time to verify is a must, so that the process goes smoothly:
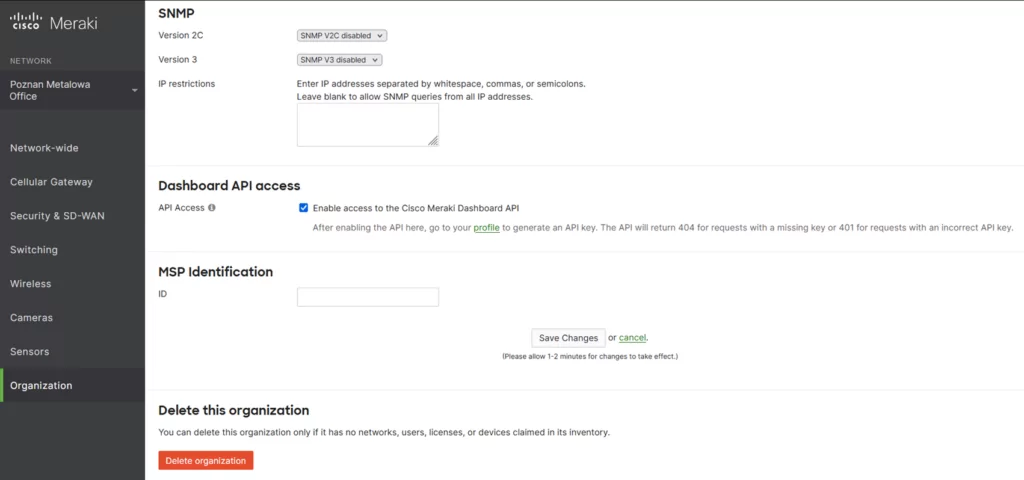
Get an API key from the existing dashboard. First, check whether the option “Dashboard API Access” in Organization -> Settings is switched on. If not, tick it and save changes.
Dashboard API Access in Meraki Dashboard
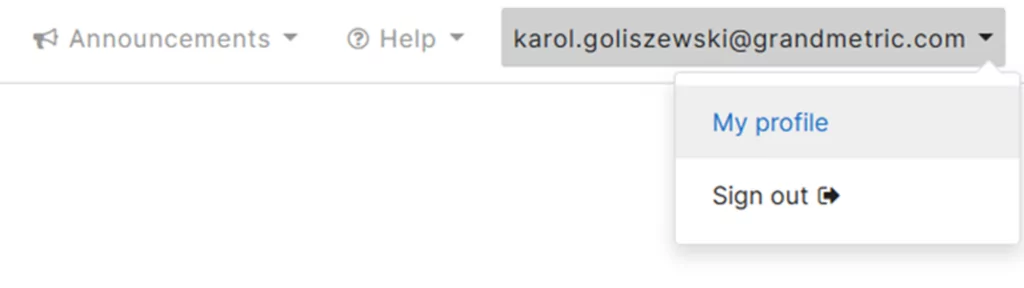
Then, in the My profile section (top right corner), select Generate new API key, or use an existing one. Note! To able to generate a key, you need to use an account with full admin permissions. Keep in mind that for a key to work, it takes as long as 15 minutes from generation.
My profile – Meraki Dashboard
Generating API key in Meraki Dashboard
More details about unblocking API access can be found here.
Check the accessibility of services on the computer to be migrated. You must be able to connect with api.meraki.com and meraki-cloud-monitoring-onboarding-app.s3.amazonaws.com using the TCP 443 port. Note! If configured, it is recommended to disable HTTPS traffic control for the duration of migration. Any form of tampering with certificates may result in the process failure.
Check the switch configuration and the accessibility of services directly on the unit:
The switch has to connect with the Internet via the front port (it cannot be a management interface!)
You must have access to the switch via SSH on the computer to be migrated
ip routing must run on the device. The default gateway set up with the ip default-gateway command is not supported during migration!
Launch the AAA mode with the aaa new-model command
The user on the switch used for onboarding must have level 15 permissions
Make sure that the DNS server was set up to be capable of solving FQDN eu.tlsgw.meraki.com (for the European area). If it’s not, add it with the ip name-server [DNS server IP address] command
Enable name recognition with the ip domain lookup command
Make sure that the time and date on the switch is set correctly, and the NTP server is configured. If it’s not, add it with the ntp server [NTP server IP address] command. You can check if the time and date is correct with the show clock command
Prepare the Meraki dashboard: if it’s yet to be configured, add a new network of a “switch” or “combined” type (note: a “combined” network should include a “switch” network). Information on how to do this can be found here.
Before commencing migration, make a backup of the switch configuration.
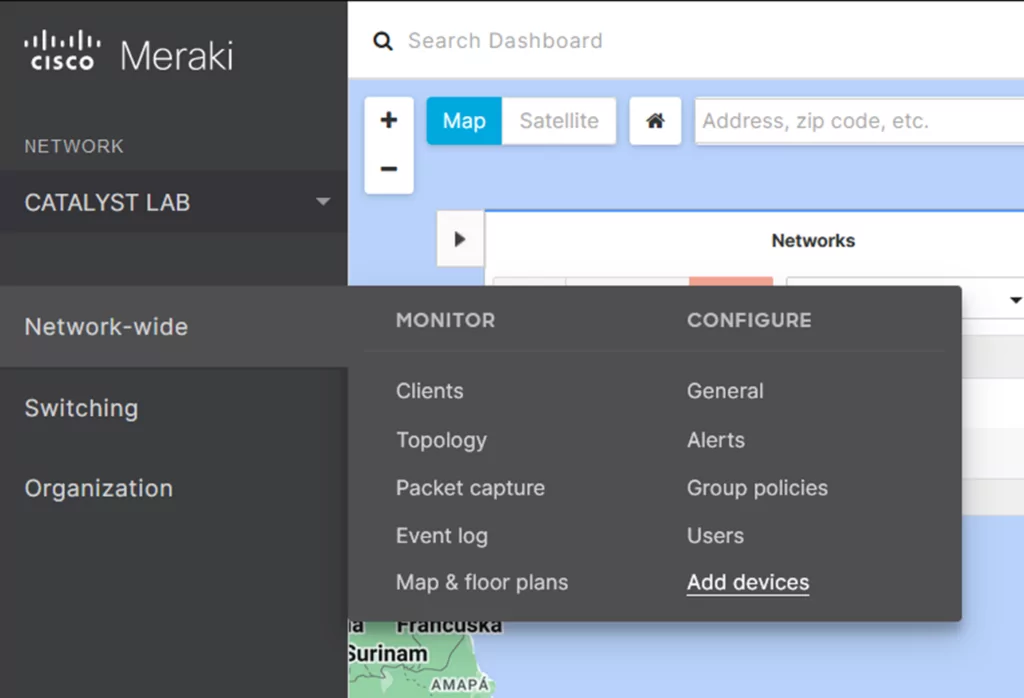
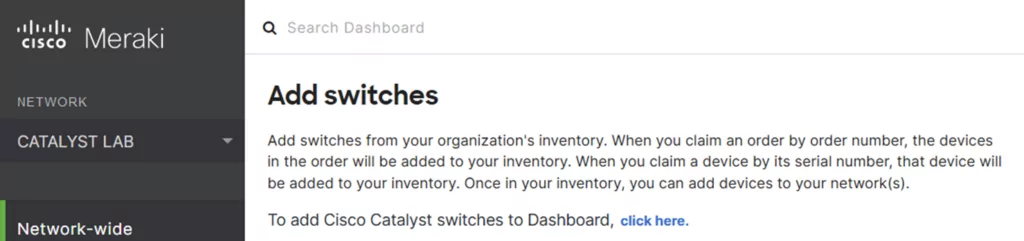
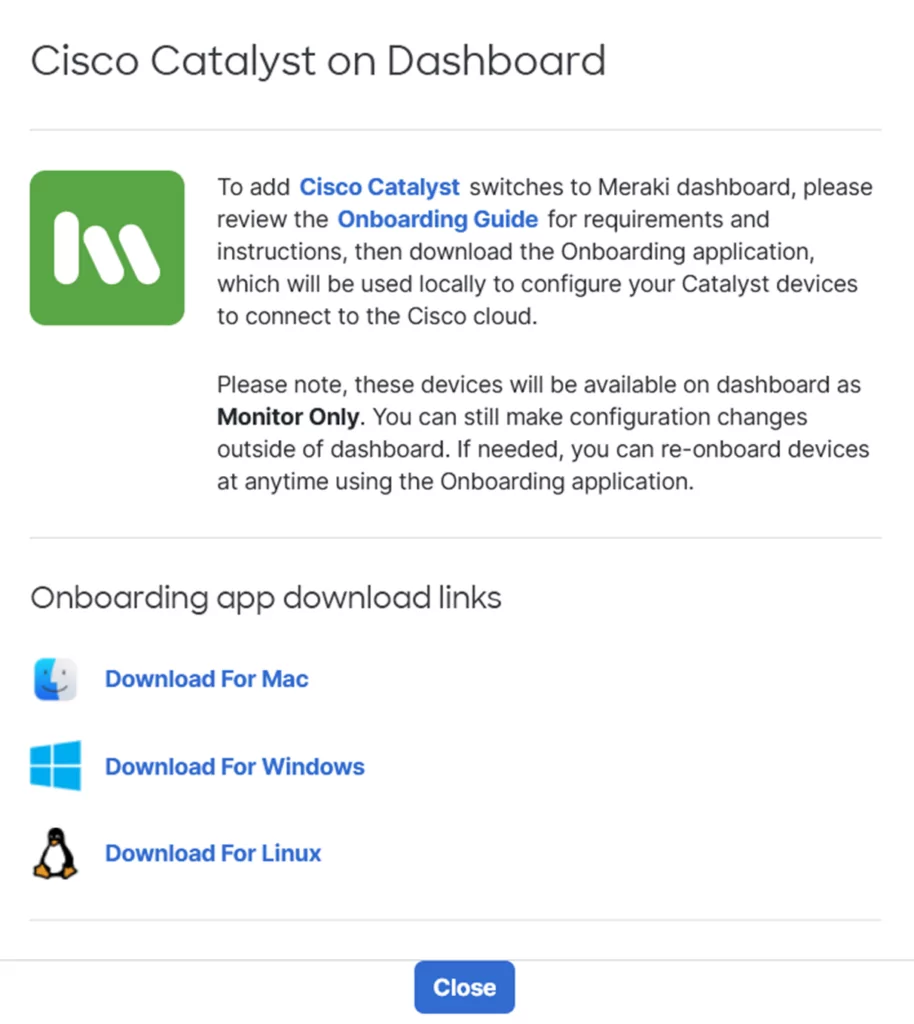
Download and install the Cisco migration app. There are versions for Windows, macOS and Linux. Alternatively, you can download the app directly from the Meraki dashboard (Network wide -> Add Devices)
Dashboard Meraki – Cisco Catalyst configurating
Adding Cisco Catalyst to Meraki
Adding Cisco Catalyst to Meraki Dashboard
Migration to Meraki Dashboard Step-by-Step
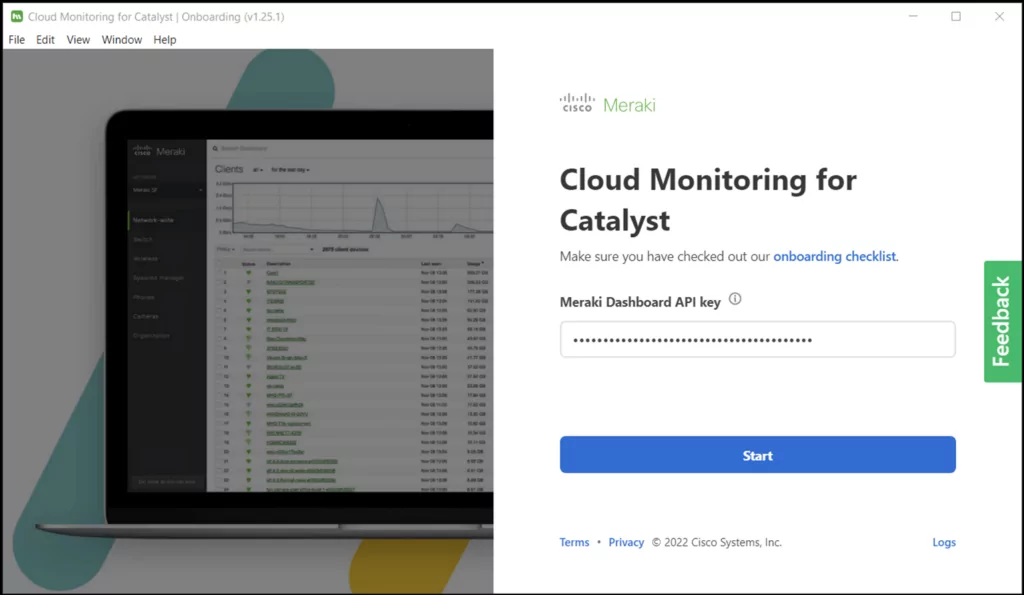
The process of migration starts with launching the app. I’ve installed it in a Windows environment. After accepting the terms & conditions, start with entering the API key generated before.
Migration to the Meraki dashboard – launching the application
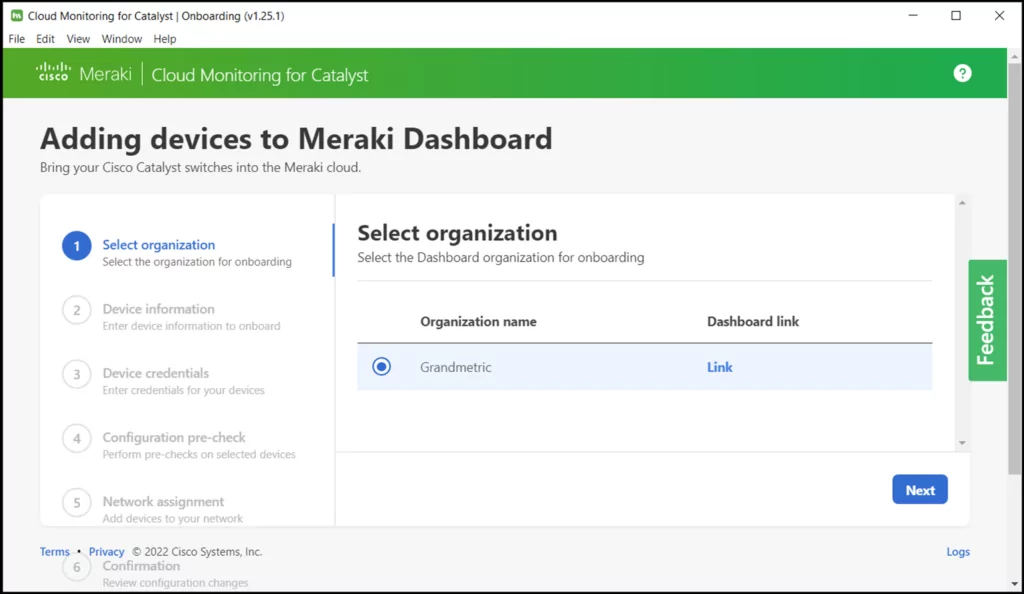
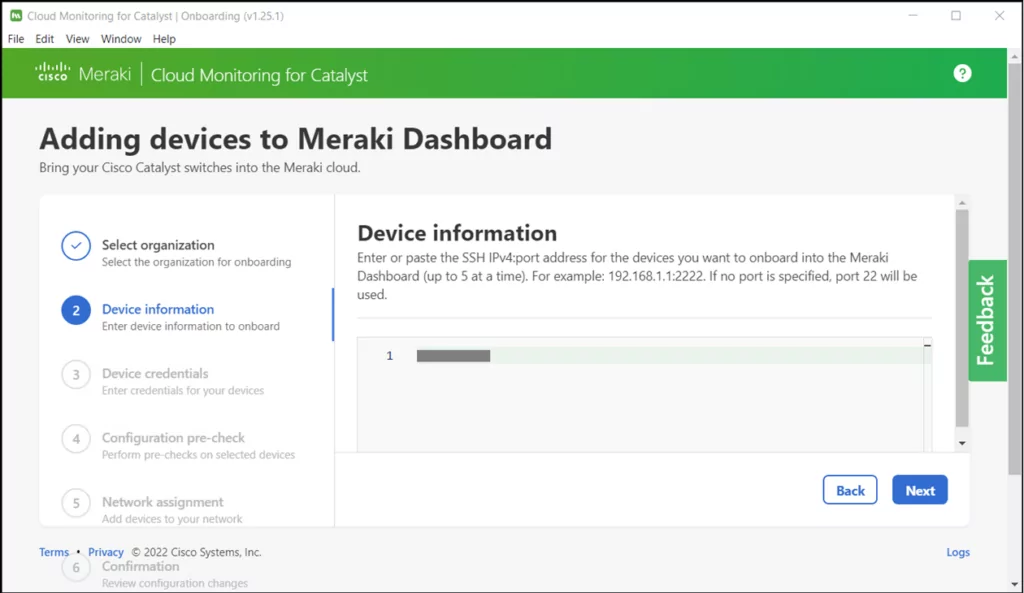
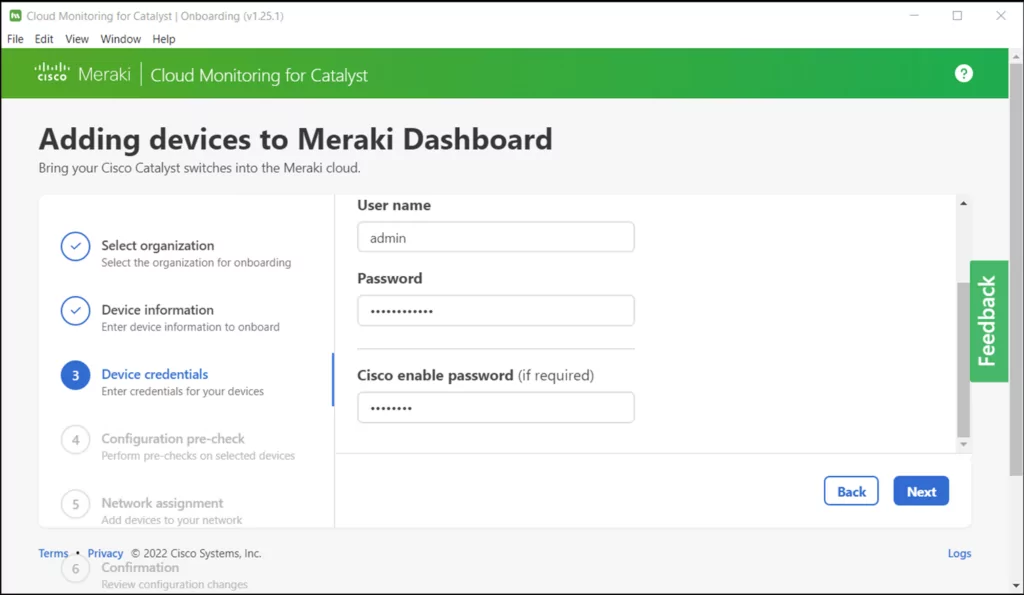
2. Next, answer a series of questions about the onboarding process:
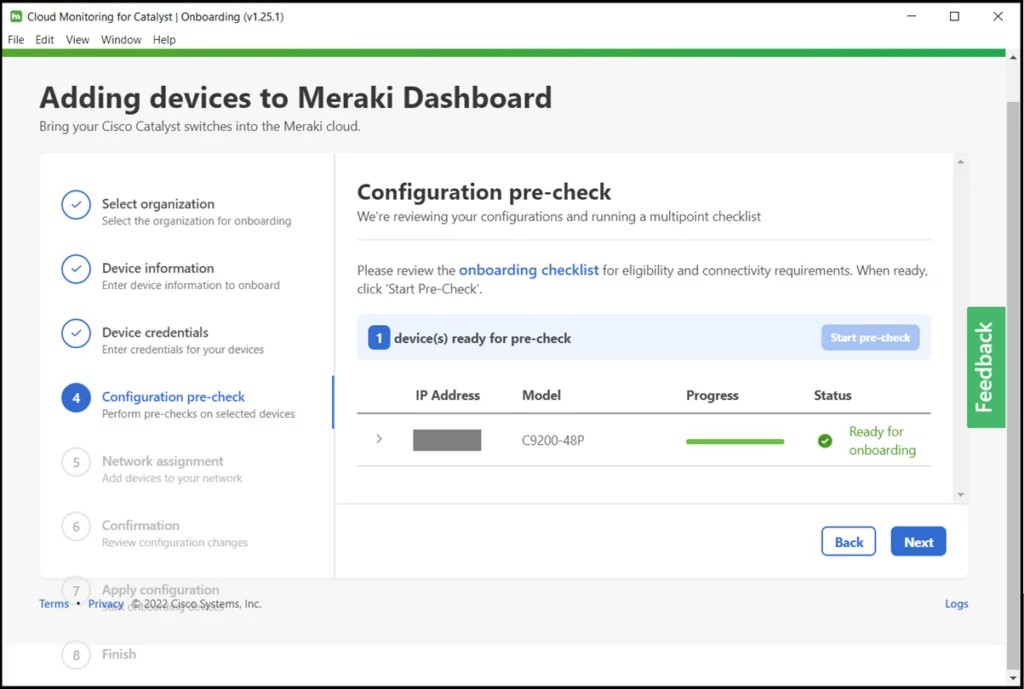
Meanwhile, we can do a preliminary check of the configuration, by clicking Start pre-check. If our switch(es), the Meraki dashboard and the computer used for onboarding have been prepared properly, the test should turn out as successful:
Meraki Dashboard – device preconfiguration
During the troubleshooting of possible errors, the Logs section, seen in the lower part of the program screen, will come in handy.
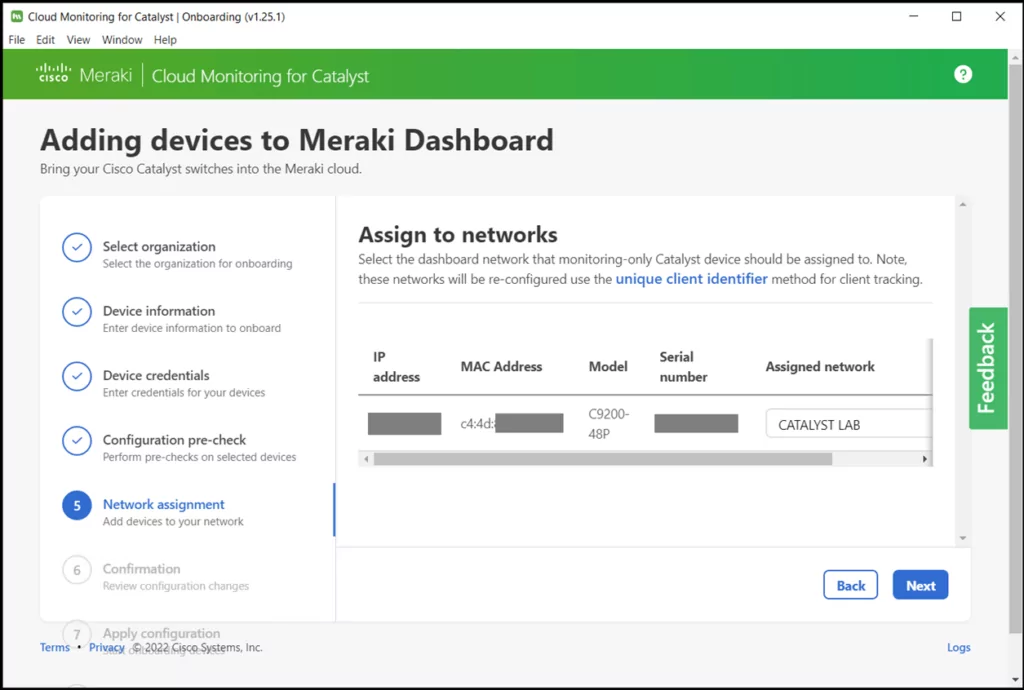
The next step will involve assigning the migrated switch to the network that we’ve prepared in the Meraki dashboard in advance.
Meraki dashboard – assigning the switch to the network
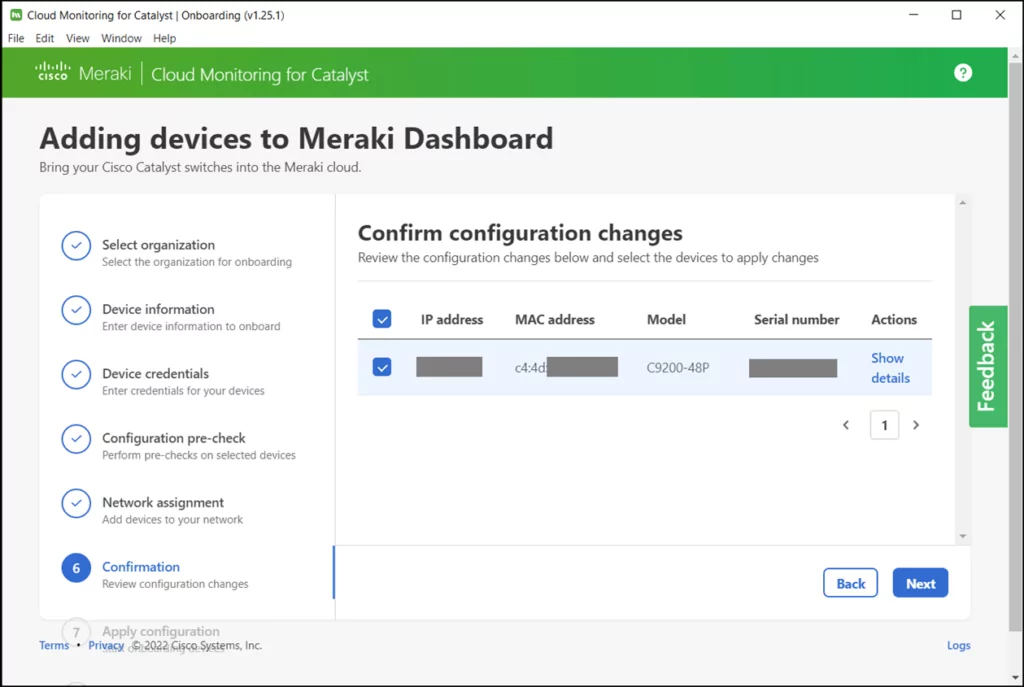
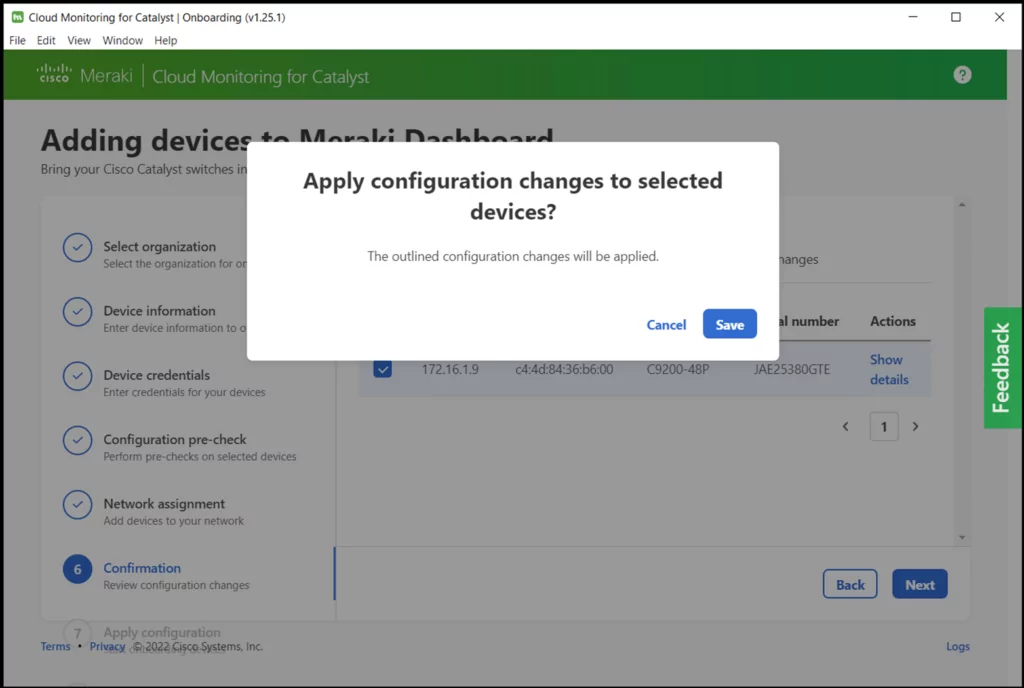
The last step, where we make a final decision to carry out migration.
Switch migration to Meraki dashboardConfirmation of switching Catalyst 9200 to Meraki dashboard
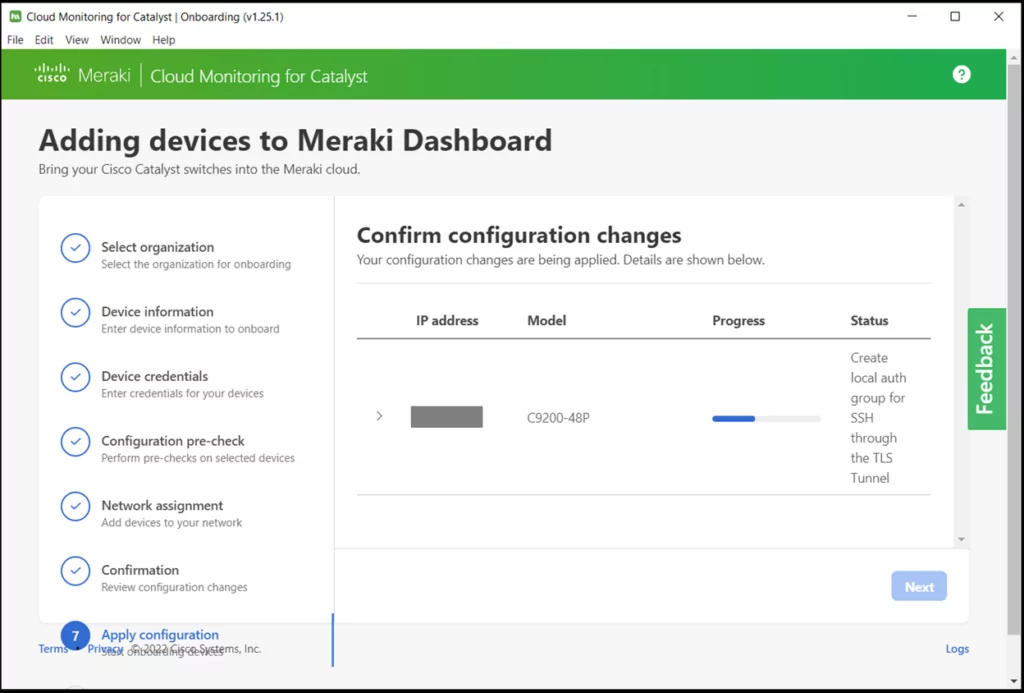
The software starts its work.
Adding a Cisco Catalyst 9200 Switch to the Meraki cloud
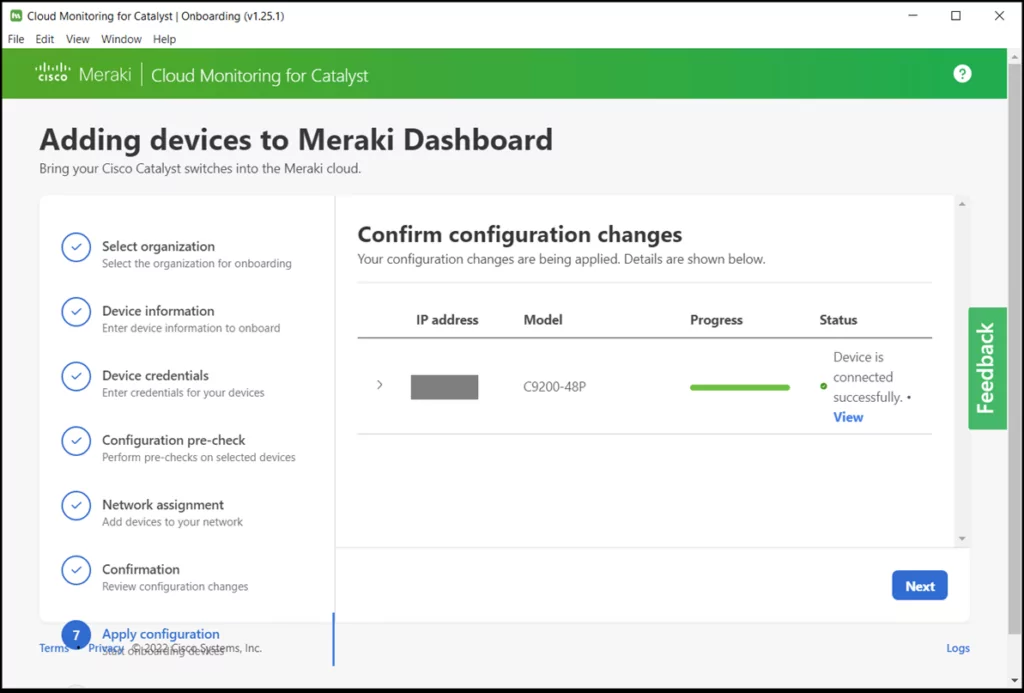
The entire process takes about 3–5 minutes, which is predominantly taken by the processing of switch details by the Meraki platform. A clear prompt will inform you about its success.
Correct device migration
Additional switches can be added
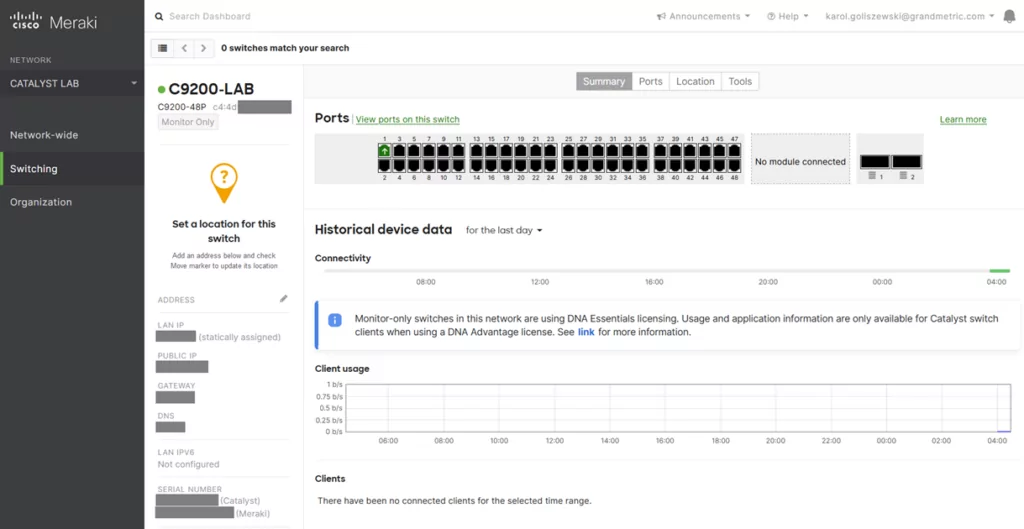
The Results of Migration to Meraki Dashboard
It should be noted that the switch provisioning process in the Meraki dashboard takes a while. I’ve seen an error-free switch status only after about 30 minutes, and it looked like this:
Switch provisioning in Meraki Dashboard
You can see all basic information about the unit and the fact that a “Monitor Only” model has been started.
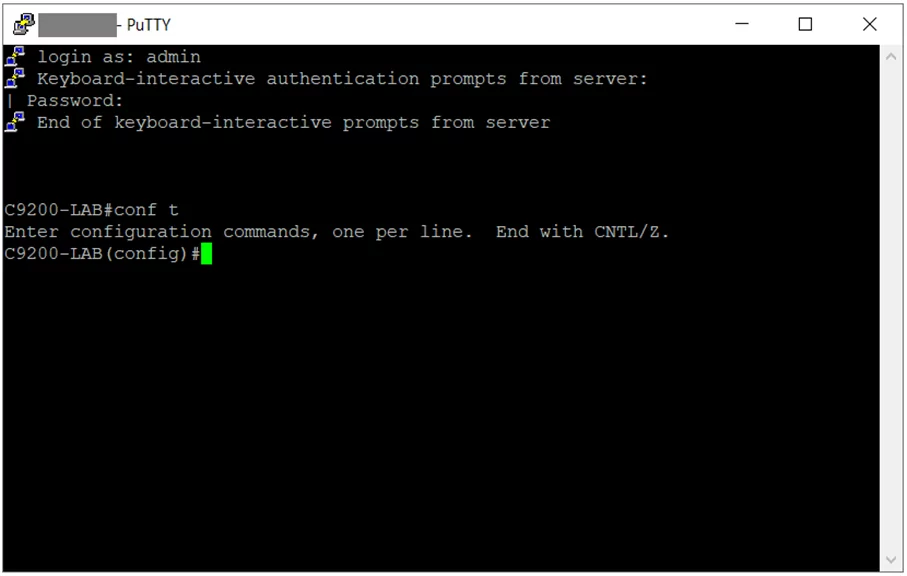
According to what Cisco says, I can log in to the switch’s CLI and make some alterations:
Changes in the Meraki Dashboard configuration by CLI
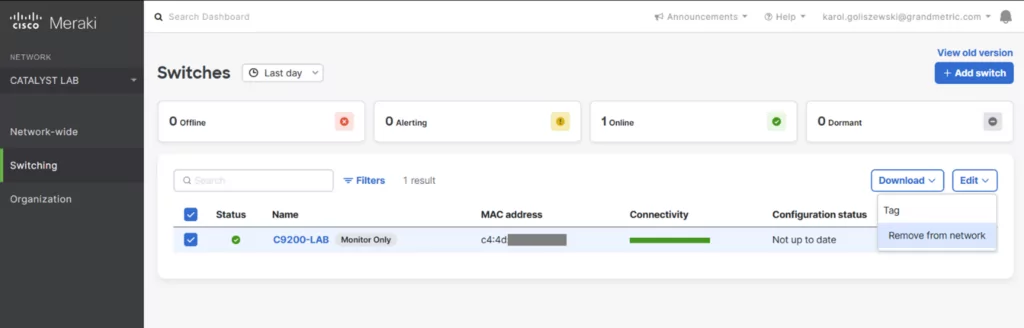
3. Removing the switch from the dashboard and return to the previous configuration.
This process is very straightforward and requires only selecting the switch that want to get rid of in the dashboard and choosing Remove from network.
This will initialize a script, which changes the configuration of the switch, de facto restoring its configuration to pre-migration settings. However, to be completely sure that the process will be completed properly, I would suggest that you make a backup of the configuration that was done before adding the switch to the Meraki dashboard.
Benefits of a Catalyst Switch Migration to the Meraki Dashboard
The option to move a Catalyst switch monitoring to the Meraki dashboard is worth looking into. We get a clear interface that allows us to review our devices, we can do some simple network troubleshooting and we have a clear insight into the switch settings in read only mode for the people that require such access (e.g. junior administrators). The migration process is relatively simple, doesn’t take long and is fully reversible.
The option to move monitoring and management to the Meraki dashboard can be an interesting proposition for businesses with scattered offices or “Internet only” sales points, where the endpoint device interfacing the Internet is provided by the ISP, and the IT department would like to keep control over the LAN infrastructure of a given location. Such formula doesn’t require investments in specialized devices for building a WAN/VPN/IPSec network.
Author
Karol Goliszewski
Experienced in the commercial areas of network and network & data security. Active in the area of communication with clients, he will help in recognizing the problem, selecting solutions and suggesting an effective implementation model. His competence is confirmed by technical certificates from Cisco, Sophos, Palo Alto and Fortinet brands.


Why need to enable AAA on the switch before onboarding, without AAA can we onboard the switch if yes explain how?
Because a Meraki user is added to the switch.
aaa authentication login MERAKI local
username meraki-user privilege 15 secret 9 blahblahblah
So without aaa new-model, this cannot happen. You should probably have this enabled for your admin access already, that’s a whole other story.